Getting Started with Logic Apps - XML to EDI X12
Continuing from last post where I explained the basics of EDI and
EDI X12 standards, let’s see how we
can enable EDI communication with Logic Apps
Logic Apps and EDI together
Earlier it was BizTalk from Microsoft which has all capabilities
around Enterprise Application Integration(EAI) and Electronic Data Interchange
(EDI)(which is server product) but with the cloud shift where everything is desired
as service, Microsoft provided Logic Apps to cater the integration needs for
cloud users and it is continuously getting matured (most of BizTalk
capabilities already added).
Read more about Logic App Fundamentals
To enable the logic apps to be leveraged in Business to
Business EDI communication Microsoft introduced Enterprise Integration Pack, which adds B2B capabilities like AS2 and X12,
EDI standards support , XML capabilities like XML Validation, XSLT
Transformation, Flat file to XML encode/decode etc.(Available as actions in Logic app e.g., AS2 Decode, Encode to X12 etc)
And an Integration Account which can be used to store all
the artifacts required to run the Enterprise Integration like schema,
maps(xslt), partners, agreements, certificates etc.
Read more about Logic App Enterprise Integration
Note : If you have worked on BizTalk, then you know that it
had capability of storing artifacts as it had dedicated database for that whereas Logic App is way to orchestrate a
business process in which you connect various applications/services/components and
for that you create API connections, and only those connection information is
stored in Logic App and not any artifacts. Thus the need of Integration
Account.
To make Logic App for B2B communications use of Enterprise
Integration Pack is to be done and below are the steps to be followed
1. Create Integration Account
2. Add the artifacts which you would be needing in
Integration account i.e., Schemas,maps, Partners etc.
3. Create a Logic App
4. Link the Integration Account to Logic App
5. Use the artifacts
Now, let’s focus on topic of this post of – enabling Logic
App for EDI X12 communication
Scenario
Say there is a company Techfindings and it wants to place an order with it’s partner company. But the partner company accepts Purchase order only in EDI X12 850 format whereas Techfindings system generates XML based order.
Steps in creating solution
1. Create Integration Account
On Azure portal, select All services and search for "integration account" as your filter, and select Integration Account
2. Create/obtain the schemas
You would need Visual Studio to create/edit the schemas and maps. Also you will have to add following extension - Microsoft Azure Logic Apps Enterprise Integration Tools for Visual Studio 2015 2.0
Note: No extension available in later version above 2015, as the extension is borrowed from BizTalk and last release of it is BizTalk 2016(extension is based on the BizTalk components and those components are only available for Visual Studio 2015). As soon as new version of BizTalk is out then the extension for BizTalk associated Visual studio would be available.
Above is XML Order Schema and below is the XML representation of EDI X12 850 schema, it can be downloaded from https://www.microsoft.com/en-us/download/details.aspx?id=39087
3. Create map
As we need to produce EDI X12 850, select Order XML as source and EDI 850 as destination schema
Once mapping is done, test and validate it (make sure all warnings and errors are resolved)
and make note of path where xslt is stored,as it is this which is to be uploaded to integration account (.btm file is not supported).
Following is the xslt
<?xml version="1.0" encoding="UTF-16"?>
<xsl:stylesheet xmlns:xsl="http://www.w3.org/1999/XSL/Transform" xmlns:msxsl="urn:schemas-microsoft-com:xslt" xmlns:var="http://schemas.microsoft.com/BizTalk/2003/var" exclude-result-prefixes="msxsl var s0" version="1.0" xmlns:s0="http://Inbound_EDI.OrderFile" xmlns:ns0="http://schemas.microsoft.com/BizTalk/EDI/X12/2006">
<xsl:output omit-xml-declaration="yes" method="xml" version="1.0" />
<xsl:template match="/">
<xsl:apply-templates select="/s0:OrderFile" />
</xsl:template>
<xsl:template match="/s0:OrderFile">
<ns0:X12_00401_850>
<ST>
<ST01>
<xsl:text>850</xsl:text>
</ST01>
<ST02>
<xsl:text>0700</xsl:text>
</ST02>
</ST>
<ns0:BEG>
<BEG01>
<xsl:text>00</xsl:text>
</BEG01>
<BEG02>
<xsl:text>PO</xsl:text>
</BEG02>
<BEG03>
<xsl:value-of select="Order/Header/PONumber/text()" />
</BEG03>
<BEG05>
<xsl:value-of select="Order/Header/PODate/text()" />
</BEG05>
</ns0:BEG>
<ns0:N1Loop1>
<ns0:N1>
<N071>
<xsl:text>BT</xsl:text>
</N071>
<N072>
<xsl:value-of select="Order/Header/CustomerContactName/text()" />
</N072>
<N074>
<xsl:value-of select="Order/Header/CustomerID/text()" />
</N074>
</ns0:N1>
<ns0:PER_2>
<PER01>
<xsl:text>BT</xsl:text>
</PER01>
<PER04>
<xsl:value-of select="Order/Header/CustomerContactPhone/text()" />
</PER04>
</ns0:PER_2>
</ns0:N1Loop1>
<ns0:PO1Loop1>
<xsl:for-each select="Order/LineItems">
<ns0:PO1>
<PO071>
<xsl:value-of select="PONumber/text()" />
</PO071>
<PO072>
<xsl:value-of select="Quantity/text()" />
</PO072>
<PO073>
<xsl:value-of select="UOM/text()" />
</PO073>
<PO074>
<xsl:value-of select="Price/text()" />
</PO074>
<PO075>
<xsl:text>EA</xsl:text>
</PO075>
<PO077>
<xsl:value-of select="ItemOrdered/text()" />
</PO077>
<PO079>
<xsl:value-of select="Description/text()" />
</PO079>
</ns0:PO1>
</xsl:for-each>
</ns0:PO1Loop1>
<SE>
<SE01>
<xsl:text>3</xsl:text>
</SE01>
<SE02>
<xsl:text>0700</xsl:text>
</SE02>
</SE>
</ns0:X12_00401_850>
</xsl:template>
</xsl:stylesheet>
4. Add schemas and map to Integration Account
Go to the integration account created earlier in step1 and select the Schemas tiles and click on add button.
Give name and browse to schema path and select the schemas, below is how it should look
Go to the integration account created earlier in step1 and select the Maps tiles and click on add button.
Give name and browse to xslt path(saved in step 3) and below is how it should look
5. Add Partners
Go to the integration account created earlier in step1 and select the Partners tiles and click on add button.
The partner which represents your organization is known as host partner -Techfindings is identity value given which is mutually defined thus qualifier is ZZ and the second partner is known as the guest partner - EDIPartner is identity value given which is mutually defined thus qualifier is ZZ. The guest partner can be another company, or even a department within your own organization.
6. Add Agreement
Go to the integration account created earlier in step1 and select the Agreement tiles and click on add button.
You and your trading partner mutually decide about how the communication has to be done i.e. protocol or transport-specific. In our scenario its X12 protocol based communication.
For transport specific B2B communication read - Getting Started with Logic Apps - AS2
Here as we are going to send EDI document, Send settings of the agreement has to be defined.
Send Settings is organized into these sections:
1. Identifiers -we have not use any Identifier
2. Acknowledgment - we have not chosen any acknowledgement as we don't need it
3. Schemas - we have selected 00401 as version, 850 as Transaction type and EDI_850 as schema
Note: In case where some other EDI documents is to be sent to same Partner, then we need to select Schema and Envelope for that as well(in same Agreement).
4.Envelopes - Standard Identifier and default values for GS
5.Character Sets and Separators - UTF 8
6.Control Numbers - Control number is added when edi doc leaves, thus a range is to be defined, here it is starting from 1 till 999999999
7.Validation.
Check following Microsoft article for more details about Send Settings - https://docs.microsoft.com/en-us/azure/logic-apps/logic-apps-enterprise-integration-x12#configure-how-your-agreement-sends-messages
7. Create Logic App and link Integration Account
Create logic app, add http trigger and save it. Go to workflow settings and link the integration account created in step 1
Create logic app, add http trigger and save it. Go to workflow settings and link the integration account created in step 1
8. Design the logic App
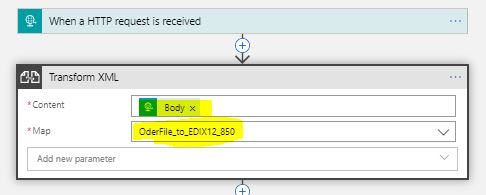
The logic app receives xml based Purchase Order over http, then it is transformed in xml representation of EDI X12 850 with help of Transform XML action.
Provide triggerbody() as content and select OrderFile_to_EDIX12_850 as Map (xslt )
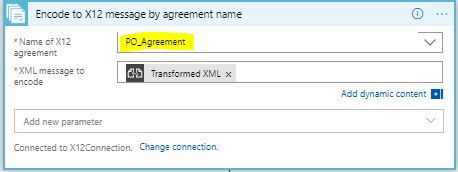
transformed EDI 850 XML is passed on to Encode to X12 message action.
Here we can use either of the option
i. Encode to X12 message action by identities
ii.Encode to X12 message action by Agreement
In any option first we need to create connection to Integration account - it is via this connection, Agreement is referred by this action from Integration Account
Option 1 - Here the identifiers are provided based on it Agreement is selected and EDI XML is encoded to EDI text file alongwith the applied envelopes(ISA-IEA and GS-GE).
Option 2 - Here you directly give the name of Agreement which is to be referred for encoding EDI XML to EDI text file
and in last step the EDI file is sent as an attachment via email . And content for that is Payload of above step (Encode to X12 message)
Although I have used email, the partners can choose http based service to receive file,FTP, SFTP and FTPS etc.
Testing
Below is xml order test input posted using ARC
and email is received with EDI 850 file as an attachment
Conclusion
In this post we covered the fundamentals of B2B EDI communication and walkthrough the steps on how to make it cloud based using Logic Apps and Enterprise Integration pack.
Related Post
- Getting Started with Logic Apps - Enterprise Application Integration
- Getting Started with Logic Apps - EDI X12 Fundamentals
- Getting Started with Logic Apps - Fundamentals
- Getting Started with Logic Apps - AS2
- Getting Started with Logic Apps - XML to EDI X12


Comments
Post a Comment